
If you’re wondering, ‘how often seal pavers,’ the simple answer is every 3-5 years. That’s the range most experts and manufacturers recommend.
However, the exact timing can shift based on your climate, foot or vehicle traffic, and the type of pavers you have. You’ll find all the details below, along with the key signs that your pavers are due for a fresh coat.
On to the details.
Why 3-5 Years Is a Practical Schedule to Seal Pavers
Sealing every 3-5 years keeps your pavers well-protected. It suits all common paver types. The schedule also allows the sealed pavers to withstand sun, rain, and daily wear.
✅Offers Maximum Protection
Sealing your pavers every 3-5 years hits the sweet spot. Sealers naturally wear off over time, so this schedule gives utmost protection, ensuring your pavers age gracefully.
✅Fits Different Types of Pavers
Sealers perform differently on different pavers. For example, on concrete, standard sealers usually last 2–5 years, but premium products can go up to 10 years. Brick pavers typically last 2–5 years as well, depending on porosity and exposure. A sealer on natural stone pavers can last 3–5 years, with harder stones and high-quality sealers sometimes longer.
The 3-5 year schedule works well for most homes, keeping surfaces protected without overdoing it. It’s short enough to prevent fading or stains, yet easy to remember and maintain.
✅Works With Weather and Traffic
Sun, rain, freezing, or heavy traffic can wear down a sealer faster. Areas with less traffic, such as garden paths, can last for closer to 3 years. That 3-5-year setup adjusts naturally to real-life use and weather without you having to guess.
How to Know When to Seal Your Pavers
The 3-5 year schedule is a reliable guideline. Still, some situations can make your pavers need attention sooner or later. Checking your surfaces ensures you reseal at the perfect time.
1️⃣The Water Test
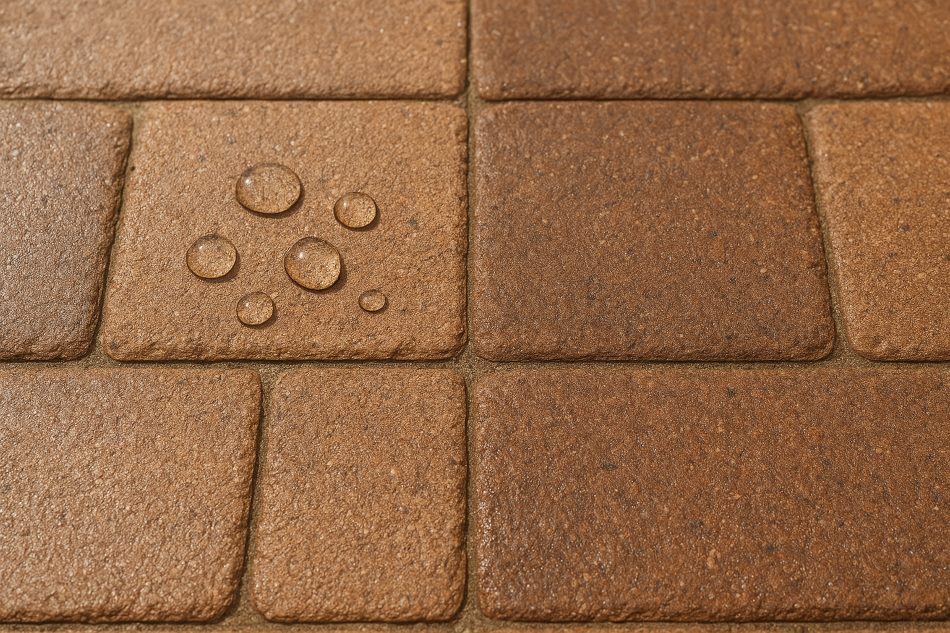
The water test is a simple experiment that helps determine if your protection is still strong. Sprinkle a few drops of water on the pavers. If the water beads up, your sealer is still doing its job. If it soaks in quickly, it’s time for a fresh coat.
2️⃣Visual Cues
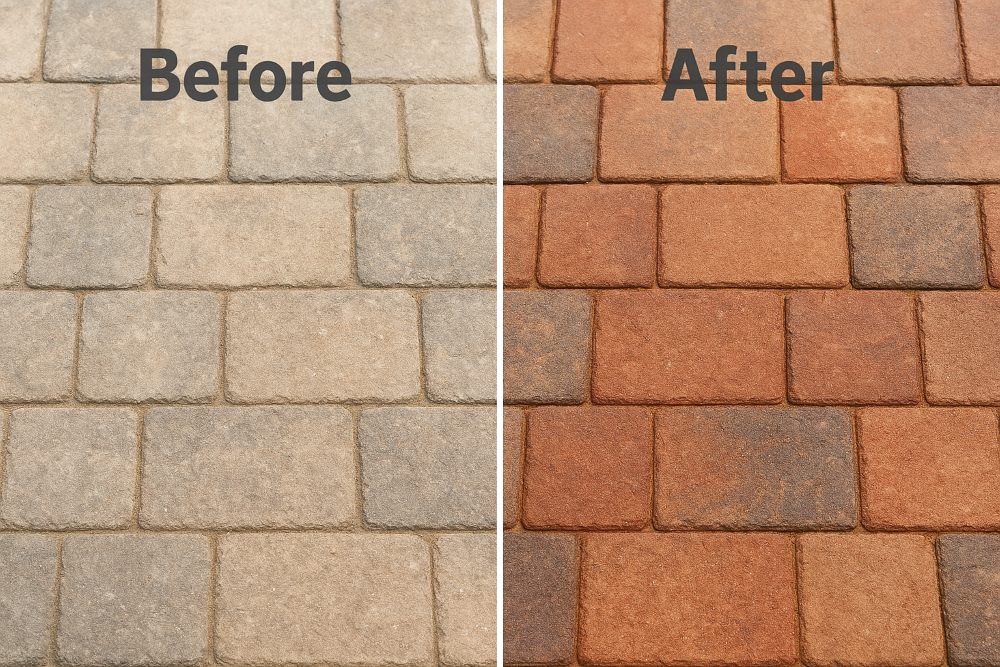
Visual cues are another easy way to know if sealing is due. Watch for fading, dulling, or surface wear. Early stains, scratches, or a loss of that wet-look are clear signs your pavers are ready for resealing.
Why You May Need to Seal Your Pavers Sooner
As explained earlier, even with a 3-5-year schedule, pavers sometimes cry out for attention sooner. And when they do, it’s usually for a reason. Knowing what causes early wear can save you a lot of headaches—and money.
Reason 1️⃣: Lack of Proper Maintenance
When pavers are rarely swept or rinsed, dirt and grit build up fast. That grit behaves like sandpaper, scratching the surface and grinding away at the sealer. The color fades, the finish looks tired, and the protection wears out long before the 3-5-year mark.
Reason 2️⃣: Not Following Proper Sealing Steps
If the surface wasn’t cleaned thoroughly before sealing, the sealer can’t stick as well as it should. Stains, weeds, old sealer, or hidden moisture get trapped underneath and weaken the finish. That leads to patchy wear or an early “please help me” look.
Proper prep is what makes a sealer last. If you need the exact process, check out our guide on how to seal ➡.
Reason 3️⃣: Using the Wrong Sealer Type
Using the wrong product is another fast track to premature resealing. Some sealers just aren’t meant for your paver type or climate. A poor match can cloud, peel, or break down way too soon.
Buying the right sealer for your pavers can save you from having to redo the whole job later. For help choosing, see our guide ➡.
By steering clear of these three mistakes, you give your pavers a real fighting chance. With proper maintenance, proper sealing steps, and the right sealer, your patio can maintain that fresh, just-installed look for a solid 3 years or more. A little care now keeps your pavers protected, vibrant, and far from needing early rescue.
How Often Seal Pavers: Our Final Thought
Now you know how often to seal pavers: every 3-5 years. That’s the sweet spot for most surfaces, though some may need attention sooner or later. Watch the signs, and your patio, driveway, or walkway will stay vibrant and protected for years.

And now, back to you.
What do you think about the every 3-5 year schedule? Too soon, just right, or could you go longer? Share your thoughts or decisions in the comments—we’d love to hear how you plan to keep your pavers looking flawless.

Leave a Reply